Thursday, June 30, 2011

Good Morning Green Smoothie :)

Good morning! Today I found myself still slightly sick from a sore throat, but having enough energy to feel ready to take on all that is life.  A standard morning in my shoes (when I'm not running out the door for work at 6 am) usually involves starting my day off with something green - and that green something is most often KALE.  This morning I grabbed some leftover beans & fresh cut tomatoes from my fridge thinking I'd just heat the beans on the stove, sautee the kale, and add an egg for an extra protein kick.  Upon returning from my garden with fresh picked kale I stood in my kitchen staring at that beautiful leafy green feeling stuck on whether my body wanted the original hot meal I had thought or if it wanted a cold raw smoothie... I was probably staring at the kale for 5 minutes going through this debate un-wavered when I just kicked myself out of it and went for the smoothie, as I haven't had one in a couple weeks and my body is feeling low so it is probably best to pump it with raw animal-protein-free love!  Green smoothies are one of my favorite things in life - they can be so versatile and are ALWAYS so delicious!  This is my basic go-to recipe:

Ingredients
- Almond, Coconut, or Hemp milk (or another non-dairy/non-soy based milk - I also try to stay away from rice milk so my only consumption of rice is in it's true form)
- 1 cup (approximately) Frozen Bananas
- 4-5 leaves of Kale
- 1 tbsp. raw cacao powder (optional - I just love chocolate ;) AND when chocolate is in this raw form it is actually AMAZING for your body and gives you a lot of energy to tackle your day!)
- 1 tbsp. Udo's 3-6-9 Oil (optional - as someone who's only animal-protein source is an occasional egg I know that my body needs an extra boost of those essential fatty acids - Udo's get's theirs from a plant-based source... even if you eat meat it is important to supplement with essential fatty acids, whether it comes from a fish source or plant)
- 1 scoop of Garden of Life's Raw Meal (optional - again, as someone who rarely eats animal protein, even though my diet is pretty well rounded and based in LOTS of vegetables and whole grains, I want to make sure my body is getting all that it needs and has the added boost to perform at it's peak performance)

Directions:
1. Blend bananas with non-dairy milk until smooth.
2. Add kale and blend until all kale is broken down.
3. Add cacao, Udo's oil, and Raw Meal. Blend until smooth.
4. Pour into a mason jar (or other available drinking vessel) for on the go usage... Enjoy!


*This usually lasts me either until lunch or to a later/lighter breakfast (the latter is usually on days when I'm up and going by 6am).

*Feel free to use a different green of choice (spinach is a great one!) and experiment with your own ingredients - I often get as crazy as adding: local bee pollen, pitted dates, goji berries, chia seeds, raw maca powder, matcha green tea powder, wheat grass powder, dulse flakes, etc. Go wild! You can also create a base with berries and water and/or a fruit juice - I did this for a long time starting out, which makes it much sweeter... it was too much fruit for my body to handle so now I pretty much stick to bananas as my only fruit.

Saturday, June 18, 2011

Zucchini Banana Cacao Bread w/ Walnuts & Cinnamon Coconut Frosting (vegan, gluten-free, soy free)

Zucchini cacao bread is one of my favorite childhood recipes and has evolved with me as I've changed my diet over the years to vegan, and then to vegan/gluten-free, and then to vegan/gluten-free/soy-free... as well as the evolution of changing variables such as what is currently in my kitchen cupboard - or in this case, on the staff shelf at GreenStar! This past week about three huge boxes of bananas were put in our staff lounge because they were overripe and we can't sell them like that. But, this is the perfect state to find bananas in because (1) they are free!, (2) they are great for freezing in bags to put in smoothies, and (3) they are just perfect for banana bread. Instead of making banana bread I just used the bananas as part of my egg replacer. I made three loafs and froze two for gifts :)

The coconut cinnamon frosting is an invention from my good friend, who first introduced it to me when she layered and frosted the zucchini cake I made myself for my birthday this past September. Ever since then this has probably topped my charts as one of my favorite frostings! And it is the perfect frosting for zucchini bread - when you want an extra bit of sweet!
Ingredients:

Zucchini Banana Cacao Bread:
1 ½ Cups zucchini, washed and finely grated
1 ½ Cup Bob's Red Mill all purpose gluten free baking flour
1 tsp. baking soda
¼ tsp. baking powder
¼ tsp. salt
½ tsp. cinnamon
½ Cup mashed bananas, apple sauce, OR canola oil (I prefer them with bananas but they're a bit more moist with the oil - I did a combination of both)
½ Cup sugar
½ Cup light brown sugar, packed
½ of 1 banana, mashed
1 tsp. vanilla extract
⅓ Cup walnuts, chopped (optional)
Cinnamon Coconut Frosting:
1 1/2 Cups Powdered Sugar
1 Cup Coconut Oil (can use palm oil if allergic or don't have the extra $ for the coconut - but the coconut flavor definitely adds quite an amazing kick!)
4 tsp Cinnamon
*This recipe is practically allergen-free when walnuts and coconut oil are taken out of the equation (always check and double check if there are special cases though)!
Directions:
1. Preheat oven to 350 degrees F and coat your bread pans with oil.
2. Grate zucchini into a large bowl.


3. In a large bowl, combine flour, baking soda, baking powder, raw cacao powder, salt, and cinnamon.
4. In a medium bowl, combine all other ingredients except the walnuts.
5. Combine both bowl's worth of ingredients and then add in the chocolate chips.
6. Fill the bread pans almost full with batter - leave about 1/2" of space from the top.


7. Bake for 40-45 minutes or until a toothpick inserted in the middle comes out clean. Note: if you use apple sauce instead of oil or bananas, your baking time will be much shorter, be sure to keep an eye on the breads.
8. While bread is baking, whip frosting ingredients together in a small or medium bowl.
9. Place bread on a cooling rack until cool.


10. Frost and enjoy!


Raw Bitter Arugula Pesto (vegan/gluten-free)

As an anything green enthusiast, one of my top favorite leafy greens is definitely arugula; with a lemony flavor and a slight bitterness, it is too aromatic and delicious to pass up.  This year I decided I would try growing it in my garden so I could have constant access to this wonderful vegetable.  However, I had never realized exactly why the arugula you buy in stores has such small leaves, while the plant, if left to it's own devices, grows very large leaves - up to almost a foot in length and 3-4 inches wide (if not larger).  Although this is quite beautiful and looks like it will be tasty, just as kale and collards have large leaves... it turns out that the larger arugula leaves get, the more bitter and almost unbearable they are to eat in anything too close to their natural format.  This all being said, I still love this vegetable too much just to dig it up out of my garden or compost all of the large leaves.  That is where this recipe for Raw Bitter Arugula Pesto comes into play!  I needed recipes which make good use of the bitterness of the large arugula leaves, but also make it edible.  Here's a simple recipe that takes less than 5-10 minutes to whip up in your food processor!

Ingredients

large handful of large Arugula
1/2 Cup Raw Walnuts or soaked Raw Almonds
3/4 Cup Extra-Virgin Olive Oil
4 cloves of Garlic
a pinch of Sea Salt, to taste (optional)
a sliver of Lemon, to taste (optional)

Directions

1. Harvest a large handful of large arugula leaves, unless it is store bought - in which case, it won't be nearly as bitter.

arugula plant
handful of arugula

2. Remove arugula leaves from stems and rinse well.
3. Peel garlic cloves and chop in a food processor.
4. Add walnuts and olive oil to food processor. Process.
5. Add arugula and process.
6. Add sea salt and lemon to taste.
7. Remove into a jar (or other storing container) and enjoy! Keep in the refrigerator after opening - can also keep in the freezer.


Raw pestos are very delicious on raw pasta (zucchini noodles!), veggies, or mixed with rice, just to name a few.  I also mixed some of this pesto with pizza sauce for a much more exciting flavor palate on my pizza!

Saturday, June 11, 2011

How to Make a Natural Bug Repellent

This Spring has been notoriously wet, which is a great habitat for mosquitos and ticks to play around in... but makes humans hesitant to spend as much time outdoors because of the increased risk of getting bit, or worse - getting a parasite carried disease.  I have never personally heard of so many people having ticks and/or getting Lyme disease before this year; so far approximately 6 people I know have Lyme disease and several more have pulled ticks off of themselves - a co-worker also told me that her doctor said that at least one person has come in every single day to get tested, which is much more than normal.


That being said, I LOVE spending time outdoors and do not feel like sacrificing that - but if you've read my earlier posts you'll know that I've also had my fair share of parasites for this year (or perhaps for many years I would hope).  I am very much against using DEET because it is extremely unnatural, and full of harmful chemicals, which  have negative side effects including rashes, skin irritation, numb or burning lips, nausea, headaches, dizziness and difficulty concentrating.  Instead of buying a more expensive natural/organic bug repellent, I decided I would make my own SUPER all-in-one natural mosquito/tick repellent! Not only does this smell great, but none of the ingredients are harmful for you or the environment.


Ingredients:
1/4 cup Witch Hazel
1/4 cup Apple Cider Vinegar
5-10 drops Eucalyptus essential oil (good for ticks)
5-10 drops Lemongrass essential oil (good for keeping mosquitos away)
5-10 drops Citronella essential oil (good for keeping mosquitos away)
5-10 drops Cinnamon essential oil (more powerful than DEET)
5-10 drops Peppermint essential oil (good for black flies)


*You can also use vegetable oil, jojoba oil, rubbing alcohol, or vodka and water as your carrier (instead of witch hazel and apple cider vinegar).
*Other good essential oils are Rose Geranium, Lavender, Neem, Thyme, and many more.


Directions:
1. Mix all ingredients together in a bowl.
2. Pour over sink, or ideally through a funnel, into tinted spray bottles (I used two 2 oz. spray bottles).
3. Apply liberally while enjoying the great outdoors!


*I think another neat way to utilize these oils for bug repellent would also be to include them in a homemade body lotion that is applied daily, although that may ware off over time and we want to be sure no one else gets bitten by any nasty bugs! - so, both a lotion and a spray may be a good route... just to play it super safe.

How to Make Violet Jam

Today is the first day I've had off in a week and a rainy day at that, what better time for jam making?  I wanted to allot more time since this was been my first (of I hope many!) jam making experience(s).  Please see my previous post on Violet Syrup for harvesting violets and the health benefits.  Here I will simply include the recipe and some interesting ideas for what to serve it with.
Jam will be a beautiful pinkish/peach color! (The lemon juice changes it from it's natural blueish/purple color)

Ingredients

1 (packed) cup violet blossoms
1 cup water

juice of one lemon
1/2 cup honey
pectin (I used 1/2 of a Sure-Jell box)
yields: three and half 8 oz. jam jars
Directions
First wash all jars thoroughly and sterilize jars & lids with hot water while making the jam.
1. Blend violets, 1/2 of the water and lemon juice.
2. Heat remaining water and honey in a saucepan and bring to a low boil.
3. Add pectin and stir until mixed well.
4. Add pectin/honey mix to blender. Blend again until smooth.
5. Transfer the jam into the canning jar(s), clean/dry the brim of the jar, put lids on tight (turning 1/4 inch back) and flip jar upside down to sit until cool.


Suggestions for Consumption

So Delicious Coconut Vanilla Ice-cream - I can only imagine that the addition of Emmy's Organics Raw/V/Gf Chocolate Sauce would make this even more mind-blowing!!


Coconut Vanilla Ice-cream w/ violet jam

*More suggestions to come soon!

Saturday, June 4, 2011

How to Make Violet Syrup

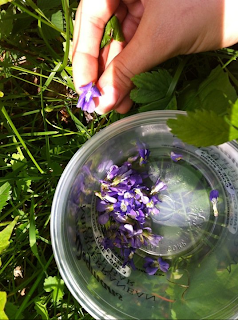
A few weeks ago a co-worker of mine at GreenStar posted a few links on how to make violet syrup and jam... I was clearly instantly hooked on harvesting my own violets and trying out these delicious sounding treats!  I have never made jam before, but luckily my mother is quite well-versed in this practice and I am pretty good with winging it on food related things.  My first step in this project was to find and harvest a good amount of wild violets (I harvested 2 pressed cups and my mother harvested 2/3 pressed cup).  Being that my schedule and the rainy weather did not permit for me to harvest any flowers in Ithaca while they were still in season, it was fortunate that I had to go home last weekend for a bridal shower for my brother's fiance - as Western New York is usually a couple weeks behind Ithaca in seasons and my parents still had a lot of violets on their property.  These flowers are extremely tiny and grow low to the ground; it took me about 2-3 hours to harvest (I took a few water/shade breaks because the sun was very intense that day).  I only harvested the flowers - no stems.


Wild violets

Picking violet flowers


After hours of harvesting! (these are very tiny flowers and take quite a long time to accumulate a decent amount)


Ingredients:
1 pressed cup violets
1 cup boiling water
2 cups raw cane sugar
1/2 fresh lemon juice

Directions:
1. Harvest 1 pressed cup violets
2. Place violets in a mason jar and steep with boiling water for about 24 hours - try to do this step as soon after harvesting as possible... I waited a couple days due to travel/scheduling issues and my violet essence turned brown instead of the beautiful blueish/purple from the recipe I followed: http://herbanlifestyle.wordpress.com/2009/04/13/how-to-make-violet-syrup/
3. Strain out violet blossoms and compost.
4. Put the strained liquid, fresh lemon juice, and raw cane sugar into a saucepan and boil on low heat for about 10 minutes.  Stir often.
5. While the syrup is on the stove get your canning jar(s) ready by washing and soaking in boiling water.
6.  Transfer the syrup into the canning jar(s), clean/dry the brim of the jar, put lids on tight (turning 1/4 inch back) and flip jar upside down to sit until cool.  As this was my first experience canning I originally used old canning lids, resulting in syrup leaking out of the jars when I turned them upside down - luckily I had new lids I sterilized quickly and used with a much less messy success!


There are many health benefits that accompany consuming violets: 
In the Middle Ages, the flower was quite extensively used in medicine. A powder produced from the dried petals and taken in water was used to counteract epilepsy, quinsy, pleurisy, jaundice and sleeplessness. A poultice of flowers and leaves was applied to the forehead to relieve headaches. The expressed juice, which forms a slightly laxative syrup, was prescribed for children. (http://www.helium.com/items/1004888-benefits-of-eating-violets) 
The leaf and flower have been used for thousands of years by millions of people as an antifungal, anti-inflammatory, and antiseptic agent.  Violets have been used to improve acne, anger, asthma, bronchitis, colds, eczema, fever, fibrocystic breast disease, grief, headache, heartbreak, lymphatic congestion, mastitis, mumps, psoriasis, scurvy, sore throat, ulcers, urinary tract infection, varicose veins, and whooping cough. Apply a cloth soaked in violet leaf and/or flower tea to the back of the neck to treat headaches. The flowers are eaten as a breath freshener. Violet leaves and flowers contain beta-carotene, vitamin C, salicylates, [and] the flavonoid rutin... (http://www.care2.com/greenliving/a-vision-of-violets-with-brigitte-mars.html)
I'm excited to incorporate this in my cooking, baking, and especially to try it in mixed drinks!